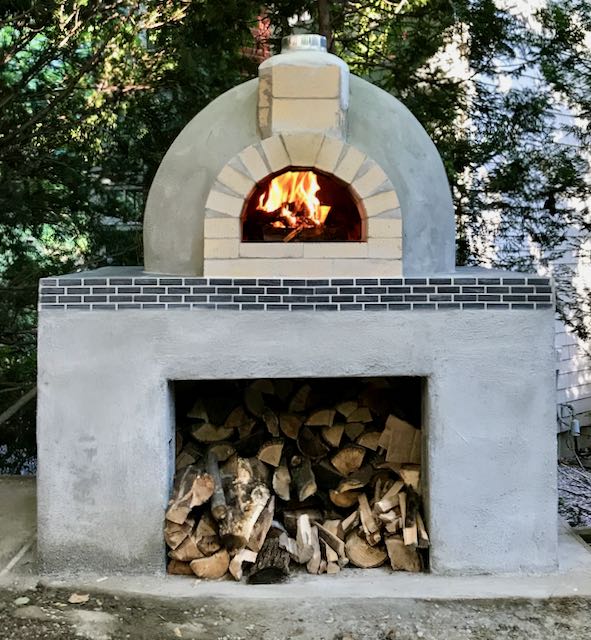
In 2018, I had the opportunity to create an oven around which to build community and friends. My design, choice of materials and build process came from a synthesis of studies of books (e.g. “The Bread Builders – Hearth Loaves and Masonry Ovens“, by Allan Scott and Daniel Wing, and “Build Your Own Earth Oven“, by Kiko Denzer and Hannah Field) and online resources, especially YouTube. I decided on a dome shaped design which could cook both breads and pizzas, and with no prior experience with masonry or brick-layer, set forth! The result was a success around which we’ve gathered friends many times over the years. Many thanks to the friends that helped build this with me, and to our great community for continuing to come to our pizza parties!
Whilst not strictly art, here’s a slideshow of the build process:
Thumbnail 1
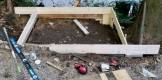
The foundation is framed out.
Thumbnail 1
Gravel is packed into the frame. Rebar (steel reinforcing rods) is laid on top to give it strength. There will be a lot of weight placed on this.
Thumbnail 1
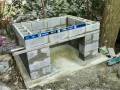
The base of the oven is built with cinder blocks which will be filled with concrete. Another slab will be built on top of this base and wood will be stored inside the base. The steel angle is to provide strength above the storage opening.
Thumbnail 1
The cinder block walls are filled with concrete.
Thumbnail 1
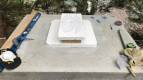
The second slab is framed out and rebar prepared. The oven will sit on this slab.
Thumbnail 1
The oven slab concrete is finished. Supports below hold the underside in place while it sets.
Thumbnail 1
The oven inner surface will sit on top of an insulative layer of calcium silicate panels.
Thumbnail 1
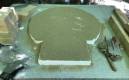
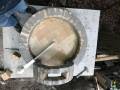
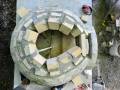
The calcium silicate panels are cut into shape, forming the cooking area footprint.
Thumbnail 1
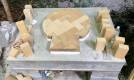
Fire bricks are cut into shape and laid over the insulative layer.
Thumbnail 1
The height of the opening, location of chimney & height of the dome are all taken into account to create the opening template which defines & supports the oven's opening arch.
Thumbnail 1
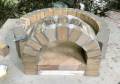
The opening arch is complete, and the first layer of dome firebricks starts to be laid using refractory cement.
Thumbnail 1
The opening arch is complete, and the first layer of the dome is complete. A guide helps with making the dome.
Thumbnail 1
The opening arch is complete, and the first layer of the dome is complete. A guide helps with making the dome.
Thumbnail 1
The opening arch is complete, and the first layer of the dome is complete. A guide helps with making the dome.
Thumbnail 1
The first three firebrick dome tiers are finished.
Thumbnail 1
The first five firebrick dome tiers are finished.
Thumbnail 1
Eight firebrick dome tiers are finished.
Thumbnail 1
Eight firebrick dome tiers are finished.
Thumbnail 1
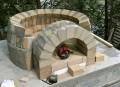
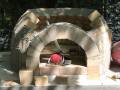
The dome is completed and the chimney built.
Thumbnail 1
The dome is completed and the chimney built.
Thumbnail 1
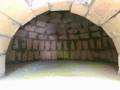
Inside the dome.
Thumbnail 1
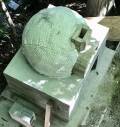
A 2" layer of high temperature ceramic fiber insulation is installed and held in place with chicken wire.
Thumbnail 1
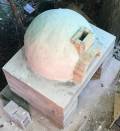
The ceramic fiber insulation is coated in a layer of cement.
Thumbnail 1
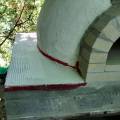
A second layer of cement is applied to the dome insulation. The surrounding surface is sealed (red stuff) and tile cement laid down.
Thumbnail 1
The surrounding surface is tiled and grouted.
Thumbnail 1
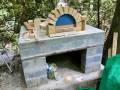
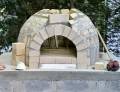
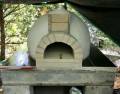
Decorative border tiles are applied and the dome and walls are stuccoed.
Thumbnail 1
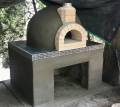
A couple of coats of sealant is applied to the dome stucco.
Thumbnail 1
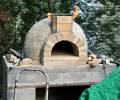
A first firing is done.
Thumbnail 1
A second firing is done.
Thumbnail 1
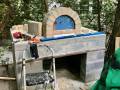
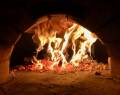
Pizza is cooked!
Thumbnail 1
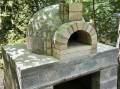
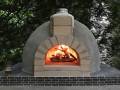
A success!
And here is some artsy slow motion footage of fire from the oven preheating. The video will automatically loop, so grab a drink, fullscreen that bad boy and sit back and relax: